If you are using an older version of AltTester and are afraid to upgrade, don’t worry, we are here to help. In this article we are sharing our own experience with a complex upgrade from AltUnityTester 1.7.0 to AltTester Unity SDK 2.0.0. It covers our methodology for instrumenting the app and seamlessly incorporating the new version into the test automation code. Additionally, the article tackles the challenges encountered during the process and outlines the effective solutions we implemented to overcome them.
Why we decided to upgrade
Most of the time, upgrading from an older version to a newer version of a tool comes with benefits that outweigh the implementation efforts. Here are two of the most compelling reasons to do it:
- Enhanced Features and Functionality: The new versions of tools often introduce enhanced features, functionalities, and improvements over older versions. Upgrading allows users to take advantage of these new features, leading to more efficient and effective work processes.
- Improved Performance and Stability: The new versions of tools typically address bugs, performance issues, and stability concerns that may have been present in older versions. Upgrading ensures that users can benefit from improved performance, reduced crashes, and a more stable working environment. This, in turn, leads to increased reliability and fewer interruptions in daily tasks.
This is also the case for AltTester. Although we knew that upgrading from v1.7.0 to v2.0.0 was going to be a lot of work, we thought it was necessary because:
- The support for the AltTester 1.8.2 will come to an end in December 2023.
The 2.0.0 versions of AltTester Unity SDK and Desktop app come with exciting new features and bug fixes that help ease the test automation process.
The Unity app that we are upgrading for
The target for this upgrade is a smart city planning platform used primarily for architecture, planning, site development, but also environmental and public engagement. Our focus for this project was to help our client add test automation to its development cycle and guide them to easily maintain the test suite (read more about our project in this case study).
We started by integrating AltUnityTester v1.7.0 (the latest version at the time) with their Unity 3D model planning app and proceeded to create tests in C# with .NET version 5. To fully achieve our goals, we saw it necessary to upgrade to AltTester Unity SDK 2.0.0 and start using AltTester Desktop 2.0.0, as these versions will ease our client’s work going forward.
If you are not already an AltTester user, you can try our solution for free. Here is a summary of what you can do :
- Run tests – you will need to have the Desktop app running (just the AltServer instance inside), without connecting the game
- See hierarchy of objects and their components
- Search object by name in hierarchy
- Interact with the screenshot area, but only using the select option
Before proceeding, it is important to highlight some unique aspects of the development process for the application:
- It uses Custom Input System which brings some challenges when upgrading the AltTester Unity SDK.
- It uses Zenject, an injection framework built specifically to target Unity 3D.
We decided to split the upgrade in two big steps, because we needed to jump six versions ahead:
- Upgrade from 1.7.0 to 1.8.2
- Upgrade from 1.8.2 to 2.0.0
1. Upgrade from AltUnity Tester v1.7.0 to AltTester Unity SDK v1.8.2
We started by familiarizing ourselves with the new features and bug fixes that were implemented with v1.8.2. Along the process, as we reproduced some errors, we discovered it was very useful to also check out the Troubleshooting and Known Issues sections from the documentation. Other useful resources:
- Release notes / Change Logs from 1.7.1 -> 1.8.2
- AltTester Unity SDK code version from GitHub tag 1.8.2
- Upgrade guide from documentation
1.1 Integrate AltTester Unity SDK 1.8.2 in test automation code
We installed AltTester Unity SDK as NuGet package using .NET CLI tool:
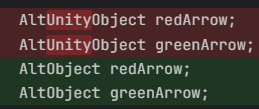
> dotnet add package AltTester-Driver --version 1.8.2After importing this new version, we had to adjust all the classes and namespaces according to the changes introduced when the AltTester Unity SDK changed its name, as you can see below some examples:


Issue 1: File altwebsocket-sharp.dll was not generated in bin when we tried to execute tests
In AltTester Unity SDK version 1.8.2 there is a known reported and meanwhile fixed bug about altwebsocket-sharp.dll. In case you want to stick with this version (we strongly recommend upgrading further 🙂) there is one more step here, as a workaround:
- get altwebsocket-sharp.dll from here and put it in the project’s bin\Debug\<netx.y> folder.
Issue 2: CallComponentMethod, GetComponentMethod, SetComponentMethod parameter changes
The test suites from this project use CallComponentMethod, GetComponentProperty and SetComponentProperty. Between 1.7.0 and 1.8.2 there were changes regarding the order of parameters and some optional parameters became required. Even though the updates didn’t cause significant issues in this part of the tool, it is important to review the documentation and make the necessary adjustments to your code.
1.2 Instrument app with AltTester Unity SDK 1.8.2
After we imported the AltTester Unity SDK as a custom package in Unity Editor, we encountered a series of errors and we started to address them one by one.
Issue 3: Multiple precompiled assemblies called NLog.dll
Because the source code from the application also has NLog as dependency, we need to remove the Nlog dll file from AltTester Unity SDK (AltTester > 3rdParty). This was the error we observed: Multiple precompiled assemblies with the same name NLog.dll included on the current platform.
Issue 4: ‘InputSystem’ does not exist in the namespace ‘UnityEngine’
This error we’ve seen in other contexts and there is a solution to patch it. Please consult
The type or namespace name ‘InputSystem’ does not exist in the namespace ‘UnityEngine’ (are you missing an assembly reference?) from FAQ > Troubleshooting page
Issue 5: Custom Input System challenges to customize Input.cs class from AltTester Unity SDK
As mentioned before, this project brings the challenge to deal with incompatibility between the application’s input system and AltTester’s input system. To solve it, we redirected the app’s custom input system to the custom input system of the AltTester framework.

This means that we had to adjust the Input.cs file from the AltTester module. We documented the behavior for our colleagues to investigate and applied a solution in order to have a namespace defined that includes the Input class, as well as the KeyStructure class which was previously defined in its own namespace.
Issue 6: Null exception in GetAxis method from Input.cs
When Playing in Editor checking Custom Input throws error in console -> “Value cannot be null”

This behavior was documented as an issue to be investigated and we proceeded by commenting instructions for _useCustomInput from the GetAxis method.
Issue 7: Altom assembly was not recognized in some of the application’s classes
Simply because the namespace changed in the new version of the AltTester Unity SDK we had to link some assembly references from the application’s source code to point to the new AltTester’s assembly definitions.
Issue 8: Zenject, ZenjectIntegrationTestFixture are not found when creating an instrumented build
This was another behavior particular for this application because of Zenject’s framework involvement. We proceeded by documenting the behavior for later investigation and applied a patch by removing BuildOptions.IncludeTestAssemblies (this code was relevant for the New Input System, but in this context we have a Custom Input System on top of the Old Input System) from AltBuilder.cs file.
This is one of the errors we observed: The type or namespace name “Zenject” could not be found (are you missing a using directive or assembly reference?).
🎉 Finally we managed to successfully create an instrumented build with AltTester Unity SDK v1.8.2. All the tests we previously created could then be executed with this new build. 🎉
2. Upgrade AltTester Unity SDK from v1.8.2 to v2.0.0
2.1 Integrate AltTester Unity SDK 2.0.0 in the test automation code
We installed AltTester Unity SDK as NuGet package using .NET CLI tool:
> dotnet add package AltTester-Driver --version 2.0.0Issue 9: The type or namespace name ‘Altom.AltDriver’ could not be found
We replaced all Altom.AltDriver -> AltTester.AltTesterUnitySDK.Driver because the namespaces from the AltTester Unity SDK changed for version 2.0.0.

2.2 Instrument app with AltTester Unity SDK 2.0.0
We made these changes:
- Deleted old AltTester folder
- Imported custom package > AltTester Unity SDK 2.0.0
All the remaining issues that arose were known and solved as described in the previous section. For example, this is the way we redirected the input to our custom input in the 2.0.0 version:

Running tests with AltTester Unity SDK v2.0.0 and with AltTester Desktop 2.0.0 launched
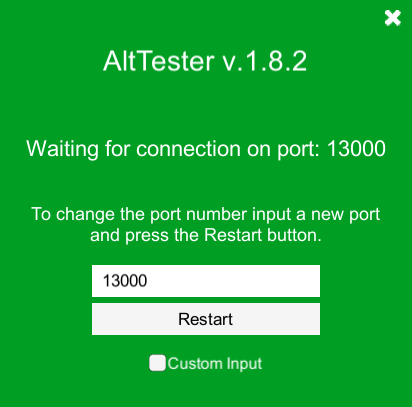
AltTester Desktop is part of the AltTester Community package, along with the SDK. Starting with the 2.0.0 versions, they are dependent on one another, because AltServer is now incorporated into the Desktop app. This means that we needed to have AltTester Desktop up and running in order to establish the connection between the server and the AltDriver in our tests, otherwise the instrumented app would be stuck in a “Waiting for connection” state.
Looking back on this process we’re glad that we both completed a successful and necessary upgrade for our client, and found a series of errors and solutions that can help our community.We hope that sharing our “eat your own dog food” experience will encourage you and provide support in upgrading to the latest versions of AltTester Unity SDK and AltTester Desktop. If you ever get stuck, you can always reach us on our Discord server or check out the documentation for more info.
