We propose another tutorial as part of our Cloud Services Integration series. By offering both client-side and server-side testing capabilities, BitBar provides a comprehensive solution for mobile app testing.
In a previous article we detailed how to Integrate Appium with AltTester® and run your test suite in BitBar (client-side), which means having a test project on your own environment and using devices from the cloud. This time you can follow instructions for integrating Appium in a C# test project and execute tests server-side on devices from the BitBar platform.
- BitBar + Appium + AltTester® = Automated tests in cloud
- What we will cover in this article
- Instrumented build of the application
- Running Server-Side Appium tests
- Pros and cons of the setups
- Final thoughts
BitBar + Appium + AltTester® = Automated tests in cloud
BitBar is widely recognized as a leading cloud service, providing opportunities to test web, native, or hybrid applications. BitBar supports Selenium-based web app testing frameworks and most native mobile test automation frameworks, across languages, such as Java, Python, and C#. The supported test automation frameworks include the following: Appium, Espresso, Flutter.
AltTester® Unity SDK is an open-source tool designed for UI-driven test automation for Unity applications, allowing you to locate objects within your application and perform interactions with them using test scripts.
We use Appium for installing the application on Android and iOS devices. At the moment of writing this article, BitBar machines use Appium Server v2.0.1. If your project already has Appium 1.x integrated, please consult migrating from Appium 1.x to 2.x documentation to be able to update accordingly, as there were some major changes.
When running tests on devices from the cloud, you gain access to a diverse set of real devices with various operating systems, screen sizes, hardware configurations, and network conditions. However, one of the main challenges is to be able to debug errors.
Moreover, considering the AltTester®’s workflow, debugging the connectivity between test script, game build and AltServer can increase the time for troubleshooting errors. BitBar offers useful artifacts once the testing session is finished, such as: console.log, device.log, appium.log screenshots, screen recording with the test execution.
What we will cover in this article
This article focuses on showing the setup we did in order to integrate Appium and execute C# tests on Android and iOS devices from BitBar Server-Side. We worked with an NUnit test project structured in the page-object-model paradigm.
We utilize this dashboard to provide an overview of the setup combinations we’ve experimented with and show the successful ones. Feel free to read the article for in-depth insights, details, and useful tips on how to replicate these configurations.

*because IProxy does not offer the possibility to do a reverse proxy (similar to how it is possible on adb reverse proxy) the instrumented game build does not connect to AltServer on localhost.
Brief description of the working setups
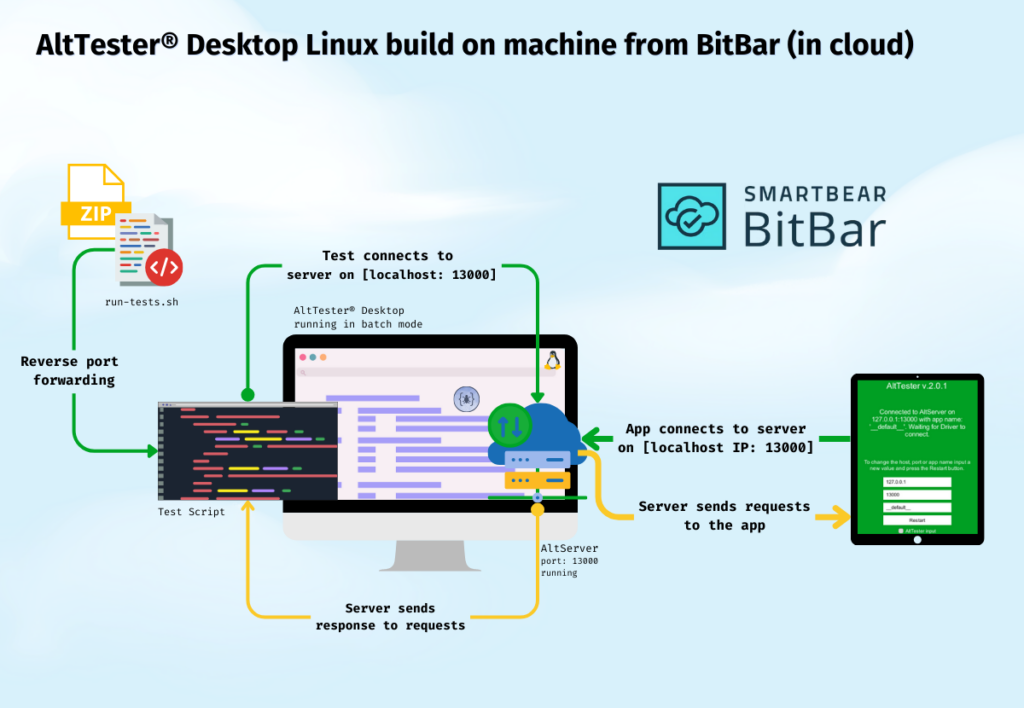
As in the case of running Client-Side Appium tests, we need to deal with the connectivity between: the test script (where we instantiate AltDriver), AltTester® Desktop and the instrumented application installed on a device in the cloud.
In a local environment, setting up is relatively simple since all three components are co-located and can interact with each other on the localhost at port 13000. For communication with a USB-connected device on Android, reverse port forwarding is employed to establish connectivity.
For iOS devices, things are not so straightforward because IProxy does not offer the possibility to do a reverse proxy (similar to how it is possible on adb reverse proxy) the instrumented game build does not connect to AltServer. Please consult a workaround from the documentation for further details.
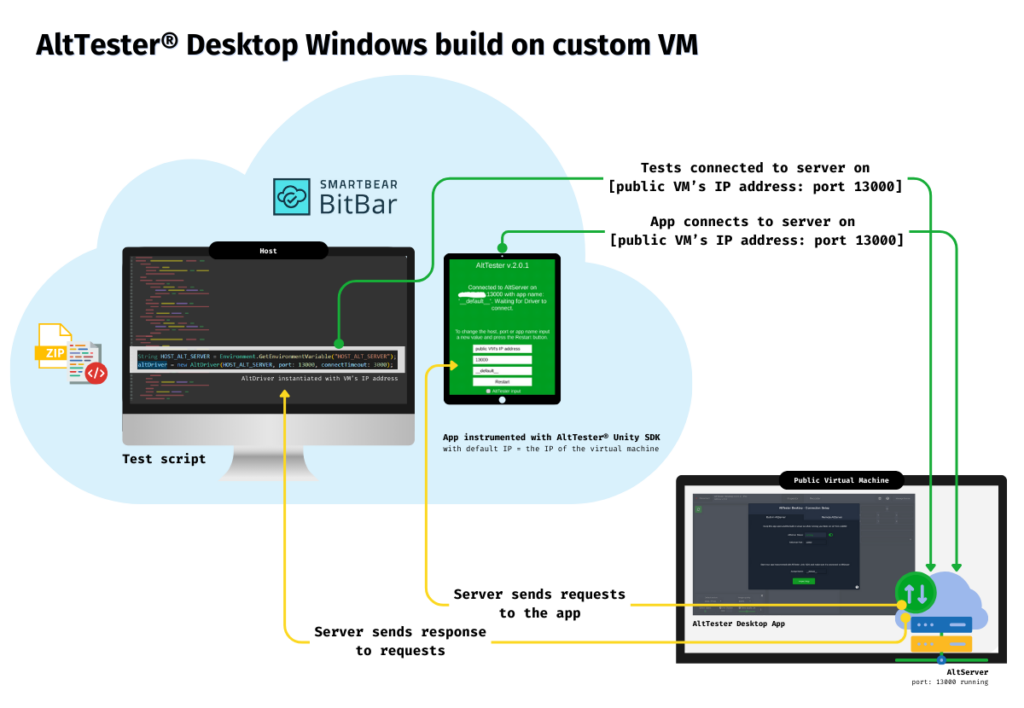
Because we used BitBar’s free plan, we got a machine and we do not have control over what IP it has on each test session. If you are considering doing the same, we strongly recommend having AltTester® Desktop installed and launched on a machine which is in your control. Please consult Create a VM for running AltTester® Desktop section for details on that.
When starting a server-side running test session with Android devices, BitBar offers an Ubuntu machine. In this case the script which will set up Appium and execute the tests, also needs to install AltTester® Desktop and activate the license. Please get the batchmode Linux build from our website.
NOTE: In order to start the AltTester® Desktop in batch mode, it is required you have an AltTester® Pro license.
For the testing session with iOS devices, BitBar offers a macOS machine. As we detailed above the connectivity between the instrumented game and AltServer can not be made, so please setup a machine of your choice and install AltTester® Desktop for that OS, as you can find packages for macOS, Windows and batchmode Linux build.
Instrumented build of the application
Prepare instrumented builds with AltTester® Unity SDK v2.0.*. Depending on what setup you want to make, you can have a build with the default localhost or change the host to have the IP value of the machine where AltServer is running and waiting for connections. Remember that for iOS build you need to change the host value in order to solve the connectivity challenge.
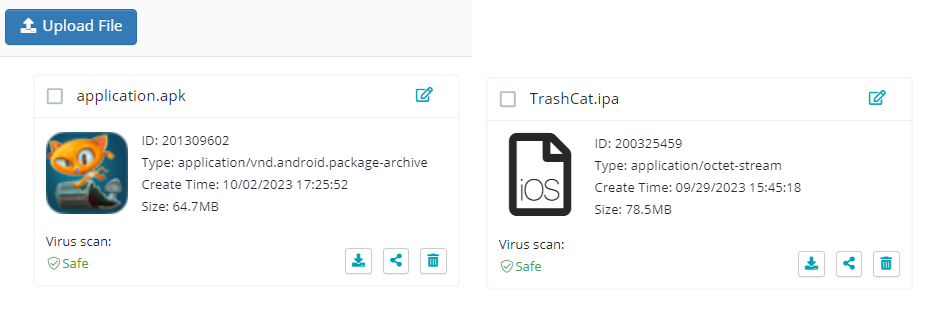
You need to upload your prepared build in BitBar’s files library.
Running Server-Side Appium tests
In BitBar’s terms, the server-side execution means that you upload to the platform everything necessary for the tests to run. Using run-tests.sh script you can install all that is needed, run tests and prepare the test report.
For this article, we prepared a repository with C# tests, so part of the setup and installation means: installing .NET. Depending on the language you use, you will need to adjust the installation part. You can also find an example with Python in our repositories.
Prepare the test project
So far, we have presented the details for having the test build prepared, and key aspects for ensuring connectivity between AltDriver, the instrumented build and AltServer. Let’s now shift our attention to the critical aspects at the code level.
Step 1: Install the necessary libraries
We prefer installing the necessary packages using dotnet cli:
dotnet add package Appium.WebDriver --version 4.3.1
dotnet add package JunitXml.TestLogger --version 3.0.134
You need the Selenium Webdriver extension for Appium for establishing a connection between our test script and the target mobile application.
The other package, JunitXml.TestLogger is required in order to have test results generated and parsed nicely in BitBar’s UI.
After installing the packages, you can see them in .csproj. Please see our example for the entire list of packages.
Step 2: Create a BaseTest file with OneTimeSetUp and OneTimeTeardown methods
In OneTimeSetUp method you need to define instructions to:
- Start Appium driver with desired capabilities
- Initialize AltDriver
Make sure that all test classes will inherit this BaseTest.cs in order to have this setup executed.
In OneTimeTearDown method you define instructions to:
- Stop AltDriver
- Quit Appium driver
a. Import the Appium namespace
using OpenQA.Selenium.Appium;b. Set Appium Capabilities
The commands for declaring, adding capabilities, and initializing the Appium driver will be similar, with slight variations based on the device’s operating system.
| Android | iOS |
|---|---|
using OpenQA.Selenium.Appium.Android; | using OpenQA.Selenium.Appium.iOS; |
public AndroidDriver<AndroidElement> appiumDriver; | public IOSDriver<IOSElement> appiumDriver; |
string appPath = System.Environment.CurrentDirectory + "/../../../application.apk"; capabilities.AddAdditionalCapability("appium:app", appPath); capabilities.AddAdditionalCapability("appium:deviceName", "Android Phone"); capabilities.AddAdditionalCapability("platformName", "Android"); capabilities.AddAdditionalCapability("appium:automationName", "uiautomator2"); capabilities.AddAdditionalCapability("appium:newCommandTimeout", 2000); | capabilities.AddAdditionalCapability("appium:deviceName", "Apple iPhone SE 2020 A2296 13.4.1"); capabilities.AddAdditionalCapability("platformName", "iOS"); capabilities.AddAdditionalCapability("appium:automationName", "XCUITest"); capabilities.AddAdditionalCapability("appium:bundleId", "fi.altom.trashcat"); capabilities.AddAdditionalCapability("appium:platformVersion", "13.4"); capabilities.AddAdditionalCapability("appium:autoAcceptAlerts","true"); capabilities.AddAdditionalCapability("appium:newCommandTimeout", 2000); |
appiumDriver = new AndroidDriver<AndroidElement>(new Uri("http://localhost:4723/wd/hub"), capabilities, TimeSpan.FromSeconds(36000)); | appiumDriver = new IOSDriver<IOSElement>(new Uri(""http://localhost:4723/wd/hub""), capabilities); |
c. Initialize AltDriver
| AltDriver and AltServer are on same BitBar machine | AltDriver needs to connect to another VM where is AltServer |
|---|---|
altDriver = new AltDriver(); | altDriver = new AltDriver(host: "INSERT_VM_IP"); |
Please consult our example of BaseTest class:
- for Android, with altDriver connecting to localhost
- for iOS, with altDriver connecting to external VM
Prepare run-tests.sh
Once you prepared the build and successfully made Appium integration in your test project, it is time to focus on working setups for having AltServer up and running in order to have the final flow working.
The run-tests.sh script is responsible for:
- installing .NET and setting it in PATH to be able to execute tests
- [optional] setup ADB reverse port forwarding so that the build from the device can connect to AltServer
- extracting the archive with tests (and optionally other dependencies)
- setting up environment variables (Appium, device specific)
- getting the application build
- starting Appium
- [optional] installing AltTester® Desktop
- [optional] launching AltTester® Desktop in batch mode
- running tests
- collecting results
- [optional] deactivating AltTester® license
NOTE: When running server-side on an Android device, BitBar offers an Ubuntu machine. Further on you can find a run-tests.sh script prepared for that. It contains the instructions for downloading, installing AltTester® Desktop Linux batch mode and activating and deactivating license.
Let’s take a closer look at command to download, install and launch AltTester® Desktop Linux build in batch mode.
wget https://alttester.com/app/uploads/AltTester/desktop/AltTesterDesktopLinuxBatchmode.zip
unzip AltTesterDesktopLinuxBatchmode.zip
cd AltTesterDesktopLinux
chmod +x ./AltTesterDesktop.x86_64
./AltTesterDesktop.x86_64 -batchmode -port 13000 -license $LICENSE_KEY -nographics -termsAndConditionsAccepted &
Once you activate your license in a script running on an external machine, you should definitely want to remove that activation. Here is how it works:
kill -2 `ps -ef | awk '/AltTesterDesktop.x86_64/{print $2}'`
sleep 5
./AltTesterDesktop.x86_64 -batchmode -nographics -removeActivation
You can find a simpler run-tests.sh script prepared for running server side on iOS devices, without the setup for AltTester® Desktop and of course without adb reverse port forwarding. This setup combination can be used when AltServer is configured on an external VM, as detailed in our previous BitBar article.
Please see our shell script examples from the repository:
Prepare the zip with tests and run-tests.sh
A critical requirement is that the archive must include not only the test files but also have the run-tests.sh script located at the root level.
AltTester® Desktop Linux build on machine from BitBar
When AltServer is running on the machine offered by BitBar, the archived package we use contains:
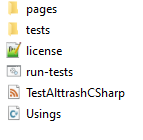
We recommend using wget in order to install AltTester® Desktop Linux build and not put it in the archive because that increases the running time for the entire flow.
An important note for this setup is that both running in batch mode and using the Linux build require an AltTester® Pro License. And of course in order to activate the license, you need to provide it. We preferred to get the license key from txt file and not put it plainly in the script 🙂
At the moment of writing this article, for running on Android we got a machine running Ubuntu 22.04.2 LTS.
AltTester® Desktop Windows build on custom VM
Obviously when AltServer is running on another machine the archived package you need upload to BitBar contains only:
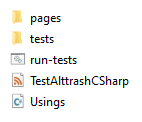
Create an automated test run
Once you have prepared the archive containing the test project, run-test.sh (and optionally license.txt), you need to upload it in BitBar’s files library.
Finally it’s time to create and start a test run:
- Create a new testing session from Automation > Create Automated Test.
- Choose the desired OS type then Appium Server Side.
- Choose carefully the app build (either ipa or apk) and the archive previously prepared and uploaded.
Please consult the BitBar’s documentation for creating a test run and the devices and device groups available.
There are a few important observations here as well.
- For the free trial version (14 days) you will get:
- Trial Android devices with 4 devices
- Trial iOS devices with 2 devices
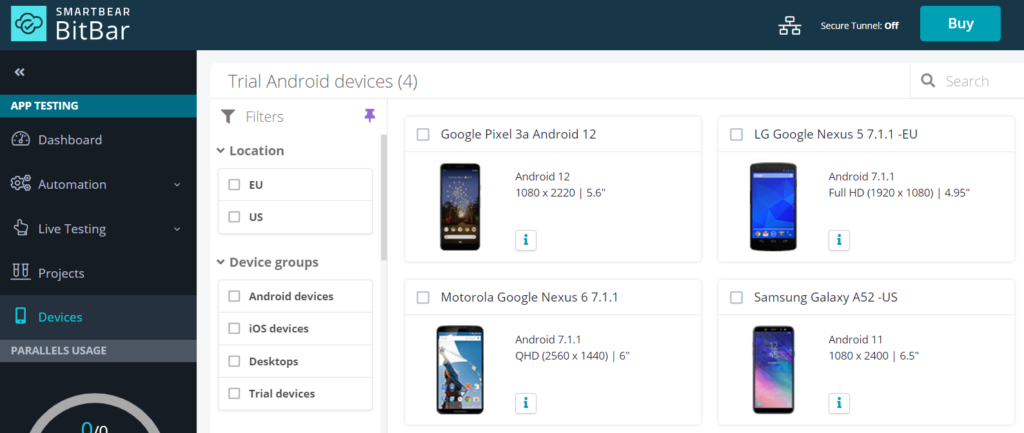

- An automated test session starts simultaneously on all the devices from the group selected. Since AltServer v2.0.* version does not support currently running the same tests (same appName) in more than one device at the same time, we need to manually abort the session on one of the devices.
NOTE: You can see a live device running by choosing the “Live” button from Session Details.
This is how a test run on trial Android devices group looks like, with one device run aborted and one session finished:
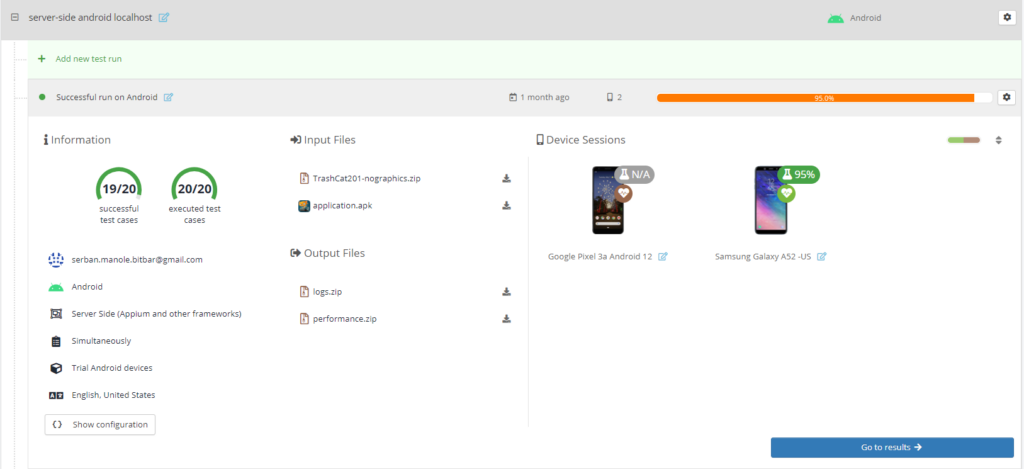
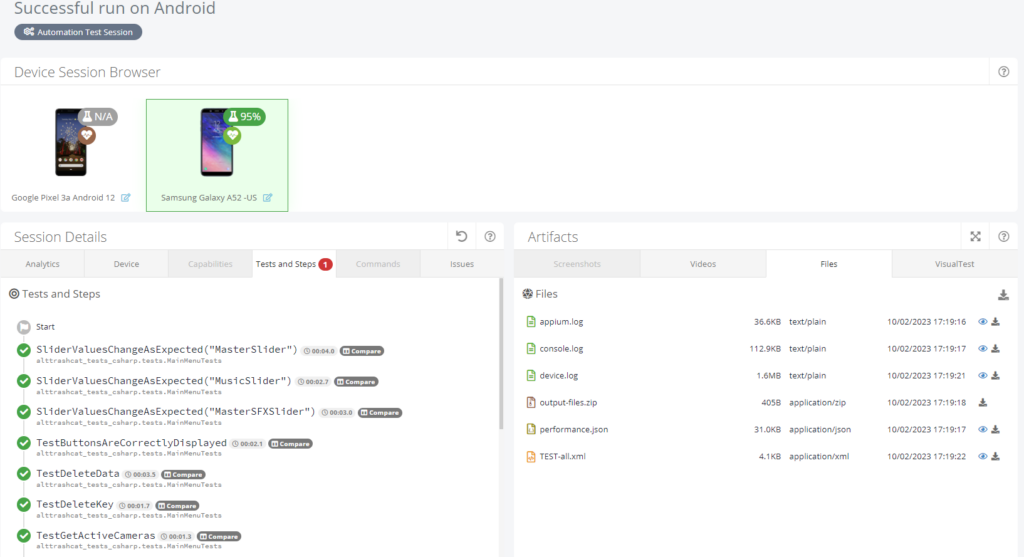
When you look at test results for the device which ran, you can see the list of tests executed and the test run artifacts:
Pros and cons of the setups
| AltTester® Desktop Linux build on machine from BitBar | AltTester® Desktop on custom VM | |
|---|---|---|
| Pros | You don’t need to maintain an external VM. | You have AltServer running any time; No worries about license if using GUI mode. |
| Cons | You need to get AltDesktop in BitBar and add your license in the zip file. On each run license is activated and deactivated. | Having a dedicated VM for AltTester® Desktop needs might imply some costs. |
Final thoughts
Our aim is that, by sharing our experiences and providing instructions, you will gain a clearer understanding of the process of integrating with Appium and running tests in the BitBar cloud.
If you have any questions, you can always reach us on Discord. Don’t forget to check out our documentation for further information.
