Welcome back to another article from the Cloud services integration series. This time we propose a walkthrough for running automated tests on devices from the BitBar platform.
In case you are interested in the other platforms, please take a look at BrowserStack, AWS or SauceLabs articles.
- A few words about BitBar
- What we will cover in this article
- Running Client-Side Appium tests
- Closing Remarks
A few words about BitBar
BitBar is one of the most popular cloud services, offering possibilities for testing web, native or hybrid applications. The application we work on for running tests is developed with Unity, so even though we use our AltTester to interact with elements, we use Appium in order to install the application on Android and iOS devices. At the moment of writing this article BitBar machines use Appium Server v2.0.1.
When running tests in a remote environment one of the challenges is to be able to see, investigate what happens and debug errors. Considering that, one of the best features of this cloud service when running automated mobile tests is that, once the session is finished, we get useful artifacts: appium.log, console.log, device.log, a video recording of the test execution.
Another feature we will take advantage of is that BitBar offers two possibilities for executing our test suites: Server-side and Client-side. Of course there are pros and cons for each, depending on your context and needs.
What we will cover in this article
We were able to test four setup combinations, two of which are from a Client-side perspective. Depending on your context and available resources, you can decide which setup suits you better.
This article focuses on showing the setup we did in order to integrate Appium and execute C# tests on Android and iOS devices from BitBar Client-side.
The remaining two setup combinations from the Server-Side perspective will be subject to a future article.
The main actors when we want to run automated tests with AltTester v2.0.* and Appium on a device in cloud service are:
- test script (where we instantiate AltDriver),
- AltTesterDesktop application (where AltServer module is included),
- a device in the cloud (where an instrumented build is installed)
The connectivity between these three entities is the main task we have to deal with.
In a local environment the setup is pretty straightforward, as all these three are in the same place and are able to communicate on localhost, port 13000. The communication with a device connected via USB is ensured using reverse port forwarding (for Android).
In a remote environment we will focus mostly on the connectivity: host, port. We share this dashboard to have an overview of the setup combinations we tried, and which were successful. Read the article along to see the details and tips and tricks on how to make them.

*we used SmartBear SecureTunnel for this case
NOTE: Running client side tests with AltServer on the same machine is currently failing even if SmartBear SecureTunnel is connected. We assume this is happening due to websocket implementation and incompatibility with AltServer.
What we observed is that:
- AltDriver from test script connects to AltServer
- Instrumented game installed on the BitBar device remain in ‘Waiting to connect to AltServer…’
We’re looking forward to getting this working together with Bitbar, but for now we propose another setup, which runs successfully but implies to set up an external publicly discoverable VM.
Instrumented build of the application
Before diving deeper in the details, a first step would be to prepare the application, to instrument your build with AltTester Unity SDK v2.0.*. Here is a helpful resource about the process. Depending on what setup you want to make, you can have a build with the default localhost or change the host to have the value of the machine where AltServer is running and waiting for connections.
It does not matter if you choose server-side or client-side, you need to upload your prepared build in BitBar’s files library.
Running Client-Side Appium tests
Running the tests from your machine offers a better control over the environment. The only thing we need to set up is the connectivity between the devices from cloud, AltDriver (from test scripts) and AltServer module from AltTester Desktop app.
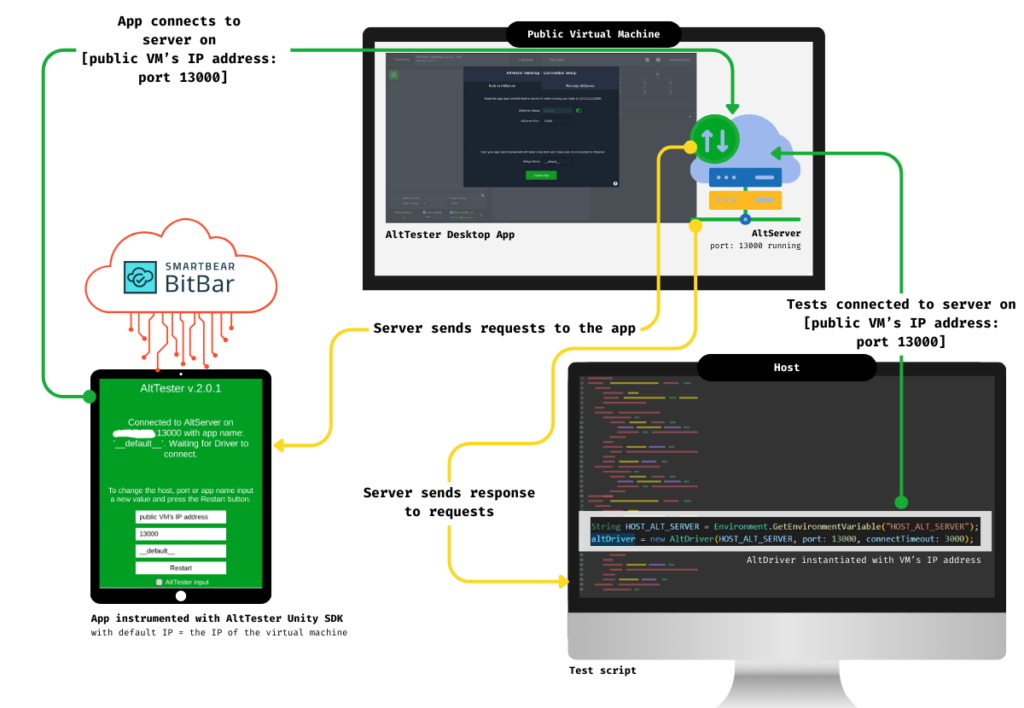
Follow Running Client-Side Appium tests to have an overview of the requirements. The steps we made to have a successful run on Android / iOS device:
- Prepare a VM accessible by your machine and devices from cloud
- Upload your instrumented build as .apk / .ipa in BitBar’s files library
- Prepare your Test Script: integrate Appium client library
The key to have these three communicating is achieving connection via IP, so you don’t need to worry about reverse port forwarding. Now let’s dive into some details for each of these steps.
Create a VM for running AltTester Desktop
We used Azure to create a virtual machine running Windows x64 architecture and we set up an AltTester Desktop instance. Please consult documentation for more detailed instructions on how to create a Windows VM in Azure portal.
The network settings required in order to have this machine publicly reachable by the devices from BitBar:
- Define an Inbound port rule for protocol TCP on port 13000: Allow connection from Any source.
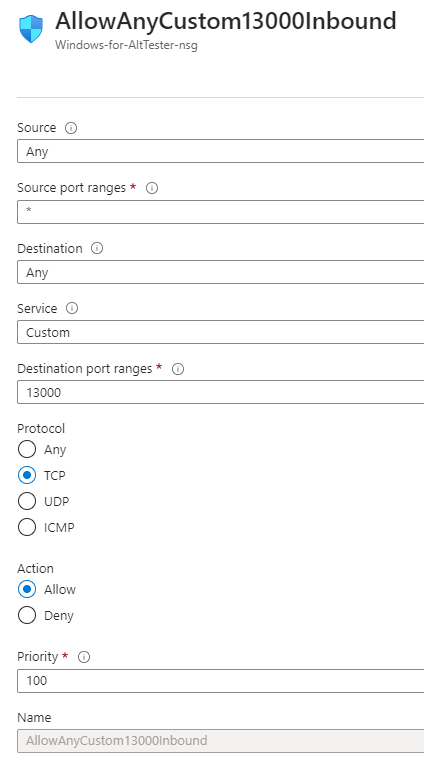
- Turn off Firewall on the VM. When we tested the connectivity between AltServer and the instrumented build, we discovered we also need to do this step.
Once you manage to connect via Remote Desktop Connection, make sure you download and install AltTester Desktop v2.0.2.
Before starting to run tests using AltTester v2.0.*, one of the mandatory steps is to have AltServer waiting for connections. You can do this either by starting it manually via GUI or by using a cmd to start in batch mode. In order to start the AltTester Desktop in batch mode, it is required you have an AltTester Pro license.
We chose to use this second option. Firstly, we have set up the path of the AltTester Desktop app executable in the system PATH environment variable. Then, from the Azure portal Operations → Run Command option, we chose RunPowershellScript.
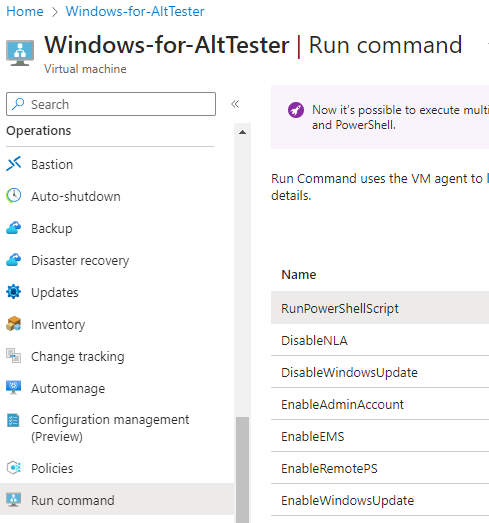
Run command:
AltTesterDesktop.exe -batchmode -port 13000 -license <your_license_key> -nographics -logfile LOGFILE.txt -termsAndConditionsAcceptedYou have now a VM where AltServer is listening for connections. In the subsequent steps, you will utilize the IP address of this machine to facilitate communication among the AltDriver from test script, instrumented build and AltServer. You will set this IP address as value for an environment variable: HOST_ALT_SERVER.
Setup on BitBar side
Once you have instrumented your build with host: <IP_of_VM_where_AltServer_is_running> upload it in BitBar’s files library. You will need to copy the ID of the application to use it later in tests as an environment variable.
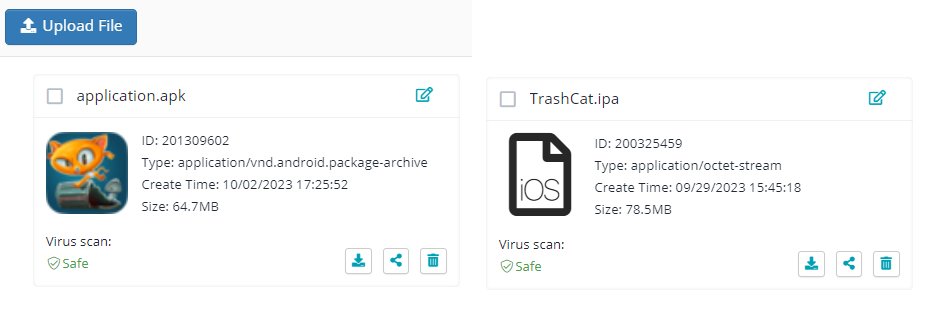
Since the tests are run from a local environment, we need a way to authenticate to BitBar. Make sure you save your API_KEY as an environment variable locally. You can get this from your account as described in documentation.
Integrate Appium and add BitBar capabilities in your test script
Up to this point, we’ve covered the steps for preparing the test build, successfully configuring AltServer, and getting it up and running. Now, let’s shift our focus to the crucial aspects at the code level, so that the final flow functions correctly.
Step 1: Install the necessary libraries
We prefer installing the necessary package using dotnet cli:
dotnet add package Appium.WebDriver --version 4.3.1The Selenium Webdriver extension for Appium is necessary for establishing a connection between the test script and the target mobile application.
In case you have not done it so far, add the AltTester-Driver package as well. 🙂
dotnet add package AltTester-Driver --version 2.0.2After installing these packages, you can find them in .csproj. Please see our example for the entire list of packages used in the C# test project.
We prefer using NUnit testing framework and you will discover references to certain attributes later in the article.
Step 2: Set up environment variables with BitBar secrets and your VM’s IP
Set the environment variables:
- HOST_ALT_SERVER = the IP address of VM where AltServer is running
- BITBAR_APIKEY = the key you have in your BitBar account
- BITBAR_APP_ID_SDK_202 = the app id you get after uploading the instrumented apk
- BITBAR_APP_ID_SDK_202_IPA = the app id you get after uploading the instrumented ipa
On Windows, set them up by running a .bat file with the set command.
set VARIABLE_NAME=valueOn macOS, use the export command as follows:
export VARIABLE_NAME=valueStep 3: Create a BaseTest file with OneTimeSetUp and OneTimeTeardown methods
These methods are defined to make sure that before executing the actual test instructions:
- Appium driver starts with desired capabilities
- AltDriver is instantiated
All test classes will inherit this BaseTest.cs in order to have this setup executed.
a. Import the Appium namespace.
using OpenQA.Selenium.Appium;b. Load the previously set environment variables.
String HOST_ALT_SERVER = Environment.GetEnvironmentVariable("HOST_ALT_SERVER");
String BITBAR_APIKEY = Environment.GetEnvironmentVariable("BITBAR_APIKEY");
String BITBAR_APP_ID_SDK_202 = Environment.GetEnvironmentVariable("BITBAR_APP_ID_SDK_202");
String BITBAR_APP_ID_SDK_202_IPA = Environment.GetEnvironmentVariable("BITBAR_APP_ID_SDK_202_IPA");
c. Set Appium Capabilities.
Depending on the device’s OS, you will use similar commands for declaring, adding capabilities and initializing the Appium driver.
- For Android capabilities, please consult the readme from Appium UiAutomator2 Driver.
- For iOS capabilities, please consult this list from Appium XCUITest Driver documentation.
BitBar offers a ‘capabilities creator’ to help with these. DesiredCapabilities() is a deprecated class, so please see our version for using AppiumOptions():
| Android | iOS |
|---|---|
using OpenQA.Selenium.Appium.Android; | using OpenQA.Selenium.Appium.iOS; |
public AndroidDriver<AndroidElement> appiumDriver; | public IOSDriver<IOSElement> appiumDriver; |
capabilities.AddAdditionalCapability("platformName", "Android"); capabilities.AddAdditionalCapability("appium:deviceName", "Android"); capabilities.AddAdditionalCapability("appium:automationName", "UiAutomator2"); capabilities.AddAdditionalCapability("appium:newCommandTimeout", 2000); capabilities.AddAdditionalCapability("bitbar_apiKey", BITBAR_APIKEY); capabilities.AddAdditionalCapability("bitbar_project", "client-side: AltServer on custom host; Android"); capabilities.AddAdditionalCapability("bitbar_testrun", "Start Page Tests on Samsung"); capabilities.AddAdditionalCapability("bitbar_device", "Samsung Galaxy A52 -US"); capabilities.AddAdditionalCapability("bitbar_app", BITBAR_APP_ID_SDK_202); | capabilities.AddAdditionalCapability("platformName", "iOS"); capabilities.AddAdditionalCapability("appium:deviceName", "Apple iPhone SE 2020 A2296 13.4.1"); capabilities.AddAdditionalCapability("appium:automationName", "XCUITest"); capabilities.AddAdditionalCapability("appium:bundleId", "fi.altom.trashcat"); capabilities.AddAdditionalCapability("bitbar_apiKey", BITBAR_APIKEY); capabilities.AddAdditionalCapability("bitbar_project", "client-side: AltServer on custom host; iOS"); capabilities.AddAdditionalCapability("bitbar_testrun", "Start Page Tests on Apple iPhone SE 2020 A2296 13.4.1"); capabilities.AddAdditionalCapability("bitbar_device", "Apple iPhone SE 2020 A2296 13.4.1"); capabilities.AddAdditionalCapability("bitbar_app", BITBAR_APP_ID_SDK_202_IPA); |
appiumDriver = new AndroidDriver<AndroidElement>(new Uri("https://eu-mobile-hub.bitbar.com/wd/hub"), capabilities, TimeSpan.FromSeconds(3000)); | appiumDriver = new IOSDriver<IOSElement>(new Uri("https://eu-mobile-hub.bitbar.com/wd/hub"), capabilities, TimeSpan.FromSeconds(3000)); |
It is important to consult the list of devices available on BitBar to know what you can set for bitbar_device capability.
Make sure you review all these capabilities before trying to execute, as you might encounter issues otherwise. For example, providing appium:bundleId is important so that the application is installed by Appium on the selected iOS device.
d. Initialize AltDriver
altDriver = new AltDriver(host: HOST_ALT_SERVER);Please see the entire BaseTest.cs file we used for running tests on an Android device.
Or consult the branch here with the example for iOS devices.
Run tests to trigger a new session on BitBar cloud
Trigger execution of tests from your machine (where you set up the environment variables). We prefer using the cmd terminal for this:
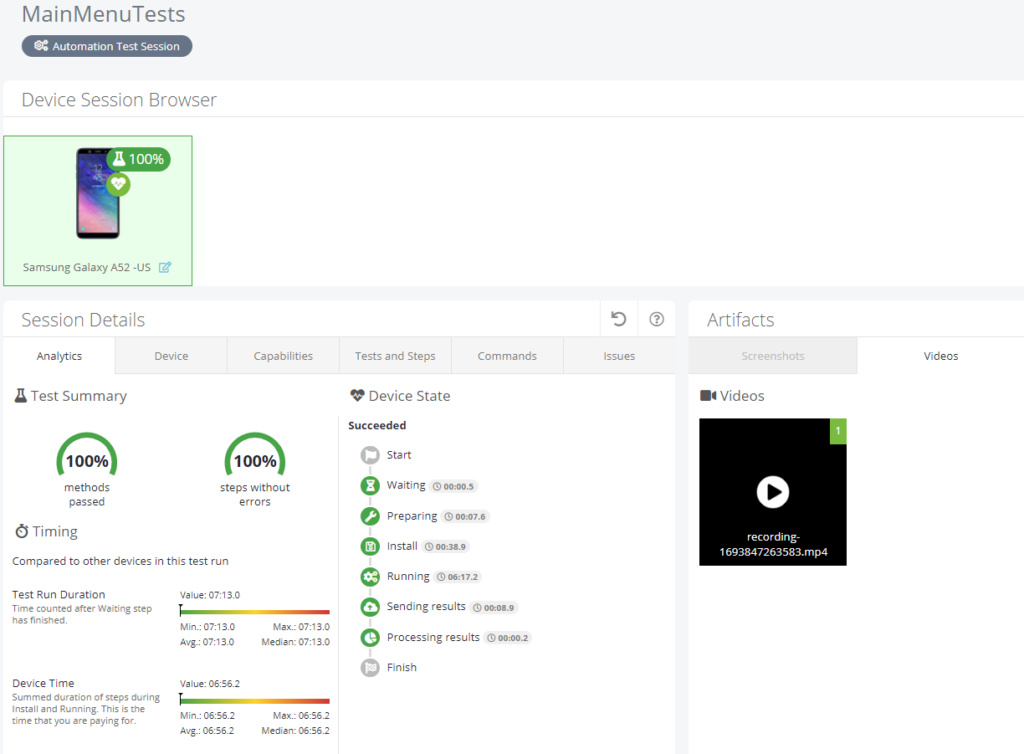
dotnet test --filter <test_class_name>A new automation test session should be visible running under the bitbar_project defined in the script. Once the test execution is finished, you can consult the logs (appium.log, console.log, device.log) and the screen record of the execution.
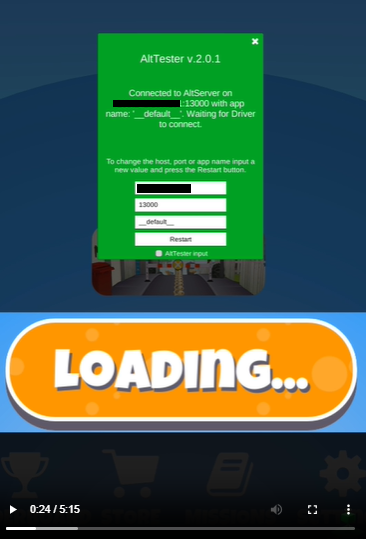
At the beginning of the screen recording, you can see the AltTester connection panel, where:
- The build is connected to AltServer: Connected to AltServer on <HOST_ALT_SERVER>: 13000 with app name: __default__.
- The AltDriver from the test script is not yet connected: Waiting for Driver to connect.
Once AltDriver is initialized in the test script with host: HOST_ALT_SERVER, you can see in the screen recording the tests that are executed.
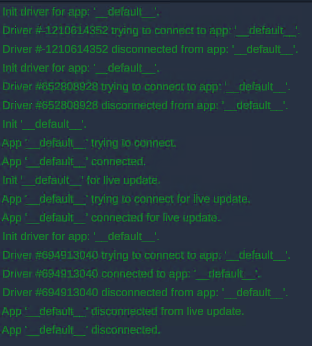
Don’t forget that the AltTester Desktop app also has logs you can see live (in GUI mode) or consult the log file generated afterwards.
This is a snippet from a test execution:
Closing Remarks
We hope that sharing our experience and instructions will help you understand what it means to try integration with Appium and execute tests in the BitBar cloud. Among the challenges we faced was the setup of a remote VM where AltServer can run. However, among the benefits of using BitBar is the fact that the test results can be shared, a screen recording is available and you get logs for debugging.
Stay close if you are interested in a Server-Side approach, as we prepare an article for that too.
If you have any questions, you can always reach us on Discord. Don’t forget to check out our documentation for further information.
