

If you’re interested to find out how you can run AltTester Unity SDK v2.0.x tests on a BrowserStack device using GitHub Actions, check out this article! Come along as we show you how to configure a workflow that runs tests on a cloud device using Appium and AltTester Unity SDK.
Throughout our journey with cloud services, we discovered that BrowserStack doesn’t support server side testing, meaning that the user can’t upload the test suite and the build on the cloud and then run them using a script. An option for running tests that are not stored locally is to integrate with CI/CD tools, like GitHub Actions.
If you want to find out how you can run AltTester Unity SDK tests client side using BrowserStack App Automate, check out our article about this topic.
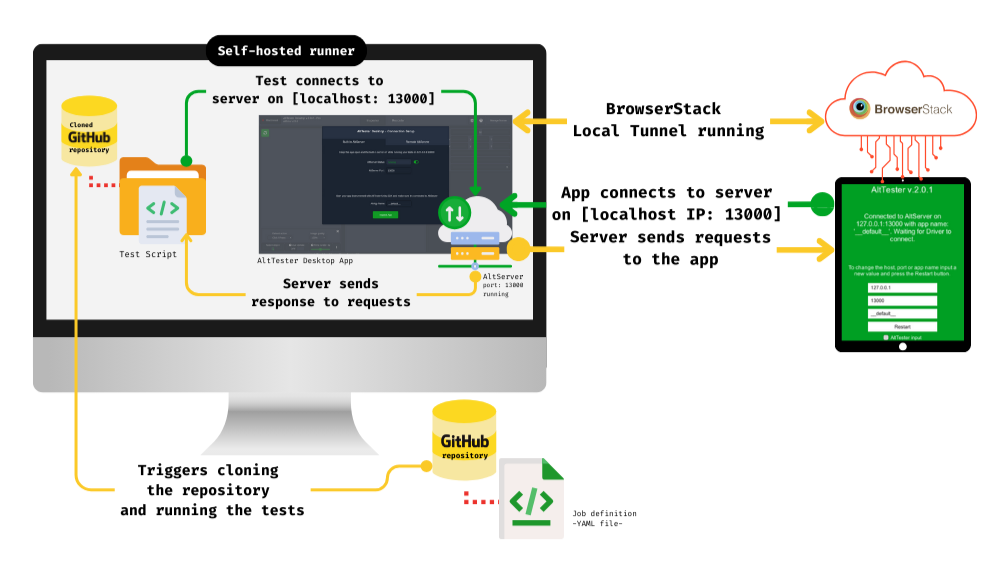
A benefit that comes with this GitHub integration is that you don’t need to have the AltTester Desktop app running on your computer in order to run the tests. In this case AltServer is running on another machine, making it possible for any team member to trigger the workflow that runs the tests on BrowserStack.
About GitHub runners
When you create a workflow in a GitHub repository, GitHub Actions needs an environment to execute the defined tasks and actions. These environments, also known as runners, are either hosted by GitHub itself (known as GitHub-hosted runners) or can be self-hosted on your own infrastructure. Here are the differences between them:
- GitHub-hosted runners:
- Provided by GitHub
- Come pre-installed with various tools and software necessary for typical workflows
- Maintained and updated by GitHub for a consistent and reliable environment
- Self-hosted runners:
- Set up on your own machines or servers
- Provides more control over the runner’s environment
- Customize with specific tools, dependencies, or configurations required for your workflows
For this integration, the best solution is to create and use a self-hosted runner because it allows you to install and run the AltTester Desktop app that keeps AltServer active at all times. Starting with the AltTester Unity SDK 2.0.0 update it is required to have AltServer running in order to run tests.
Local testing connection using BrowserStackLocal
An important aspect of running tests on BrowserStack is that there’s a local testing connection needed. Local Testing, a BrowserStack option, allows us to conduct automated test execution for mobile apps that access resources hosted in development or testing environments.
In this case we need a connection between the self-hosted runner that executes the tests and the BrowserStack device. You’ll find the BrowserStackLocal setup below, at Step 5: Create a new file for BrowserStack and Appium configuration.
A bit of context about the test project
For this integration we used the C# tests written for TrashCat, one of Unity’s sample games that we instrumented with AltTester Unity SDK v2.0.1 and created builds for Android and iOS. The final repository is called EXAMPLES-CSharp-Cloud-Services-AltTrashCat and it is one of our many examples available on GitHub.
Prerequisites
- Test suite – we used EXAMPLES-TrashCat-Tests
- GitHub account and repository with the test suite
- BrowserStack account – there is a free plan available that offers 100 min to run tests
- .NET v5.0+ and NUnit v3.0.0+
- A machine available to be defined as self-hosted GitHub runner
Setup steps
To successfully run AltTester-based C# tests on BrowserStack using GitHub Actions, follow the next steps that will guide you through BrowserStack configurations, using a self-hosted runner, creating an .yml file that controls the runner and adjusting your test repository to use Appium.
Step 1: Create a self-hosted runner and have AltServer running
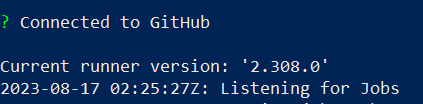
For creating this testing context a Windows machine was defined as runner, but it is possible to use other systems as well. Please follow the GitHub documentation for more details.
The ‘Listening for jobs’ line confirms that it is up and running.
Now download, install and open the AltTester Desktop app (which contains AltServer).
Step 2: Upload a test build of your app in BrowserStack and get the generated URL
Once you are logged into your BrowserStack account, upload your build instrumented with AltTester Unity SDK using the UI button available on Dashboard.

Step 3: Set credentials and app id as GitHub Secrets
Similar to client-side testing on BrowserStack, in order to be authenticated, you need to define your username, access key and app id (optional) as environment variables. To do that, you should set them as GitHub Secrets first, due to the sensitivity of the information. Secrets can be defined in the Settings section of your repository.
Step 4: Create .yml file and set environment variables
Workflows are typically described in YAML files, where developers can specify the sequence of actions to be executed, dependencies between actions, and conditions for triggering the workflow.
Create a .yml file in your repository, under the .github/workflows folders. You can find it in the example repository as BrowserStack.yml.

To set the GitHub Secrets values as environment variables for your tests, use the following lines in the .yml workflow file:
env:
  BROWSERSTACK_USERNAME: ${{secrets.BROWSERSTACK_USERNAME}}
  BROWSERSTACK_ACCESS_KEY: ${{secrets.BROWSERSTACK_ACCESS_KEY}}
  BROWSERSTACK_APP_ID_SDK_201: ${{secrets.BROWSERSTACK_APP_ID_SDK_201}}
Step 5: Create a new file for BrowserStack and Appium configuration
In your repository, create a new file that will hold the required settings for the integration. This file will hold all of the Appium and BrowserStackLocal settings that ensure the connection between the local environment and the cloud device. For future reference it will be called BaseTest. Every test file in this project inherits this C# class.
In this file add code that will:
- Access the environment variables for BrowserStack credentials and app id
String BROWSERSTACK_USERNAME=Environment.GetEnvironmentVariable("BROWSERSTACK_USERNAME");
String BROWSERSTACK_ACCESS_KEY = Environment.GetEnvironmentVariable("BROWSERSTACK_ACCESS_KEY");
String BROWSERSTACK_APP_ID_SDK_201 =
Environment.GetEnvironmentVariable("BROWSERSTACK_APP_ID_SDK_201");
- Configure Appium capabilities (device details) and BrowserStack options (e.g. authentication, session details, local tunnel settings)
| Android | iOS |
|---|---|
AppiumOptions capabilities = new AppiumOptions(); Dictionary<string, object> browserstackOptions = new Dictionary<string, object>(); browserstackOptions.Add("projectName", "TrashCat"); browserstackOptions.Add("buildName", "TrashCat201Android"); browserstackOptions.Add("sessionName", "tests - " + DateTime.Now.ToString("MMMM dd - HH:mm")); browserstackOptions.Add("local", "true"); browserstackOptions.Add("userName", BROWSERSTACK_USERNAME); browserstackOptions.Add("accessKey", BROWSERSTACK_ACCESS_KEY); capabilities.AddAdditionalCapability("bstack:options", browserstackOptions); capabilities.AddAdditionalCapability("platformName", "android"); capabilities.AddAdditionalCapability("platformVersion", "11.0"); capabilities.AddAdditionalCapability("appium:deviceName", "Samsung Galaxy S21"); capabilities.AddAdditionalCapability("appium:app", BROWSERSTACK_APP_ID_SDK_201); | AppiumOptions capabilities = new AppiumOptions(); Dictionary<string, object> browserstackOptions = new Dictionary<string, object>(); browserstackOptions.Add("projectName", "TrashCat"); browserstackOptions.Add("buildName", "TrashCat201iOS"); browserstackOptions.Add("sessionName", "tests - " + DateTime.Now.ToString("MMMM dd - HH:mm")); browserstackOptions.Add("local", "true"); browserstackOptions.Add("userName", BROWSERSTACK_USERNAME); browserstackOptions.Add("accessKey", BROWSERSTACK_ACCESS_KEY); capabilities.AddAdditionalCapability("bstack:options", browserstackOptions); capabilities.AddAdditionalCapability("platformName", "ios"); capabilities.AddAdditionalCapability("platformVersion", "16"); capabilities.AddAdditionalCapability("appium:deviceName", "iPhone 14"); capabilities.AddAdditionalCapability("appium:app", BROWSERSTACK_APP_ID_SDK_201); |
- Configure the local testing connection (BrowserStackLocal)
browserStackLocal = new Local();
List<KeyValuePair<string, string>> bsLocalArgs = new List<KeyValuePair<string, string>>() {
                        new KeyValuePair<string, string>("key", BROWSERSTACK_ACCESS_KEY)
};
browserStackLocal.start(bsLocalArgs);
- Start Appium Driver
| Android | iOS |
|---|---|
appiumDriver = new AndroidDriver<AndroidElement>(new Uri("https://hub-cloud.browserstack.com/wd/hub/"), capabilities); | appiumDriver = new IOSDriver<IOSElement>(new Uri("https://hub-cloud.browserstack.com/wd/hub/"), capabilities); |
- Initialize AltDriver
altDriver = new AltDriver();- [iOS] Handle permission pop-up
While running your tests on iOS you might get a pop-up that asks for permission to connect to devices on the local network.

To accept this notification and give permission, use the following lines:
IWebElement ll = appiumDriver.FindElement(OpenQA.Selenium.By.Id("Allow"));
ll.Click();
- Keep Appium alive
- In this context, Appium is only used to install the test app and access it on the BrowserStack device. After that, the AltTester SDK picks up the connection and carries out the tests.
- To avoid getting the BROWSERSTACK_IDLE_TIMEOUT exception after 90 seconds, add a method that interacts with Appium after every test
[TearDown]
public void KeepAppiumAlive()
{
appiumDriver.GetDisplayDensity(); //android
}
- Quit Appium Driver and stop the local tunnel
[OneTimeTearDown]
public void DisposeAppium()
{
    Console.WriteLine("Ending");
         appiumDriver.Quit();
    altDriver.Stop();
         if (browserStackLocal != null)
         {
                browserStackLocal.stop();
         }
}
The example file is available on GitHub. To see a more detailed version of these steps check out our article about running AltTester-based C# tests on BrowserStack App Automate.
Step 6: Define the workflow and run it
Inside the workflow file (BrowserStack.yml), define a job that will configure the machine environment and run the tests. To do that, give a name to your job, assign the runner using labels and define the steps needed to run your tests.
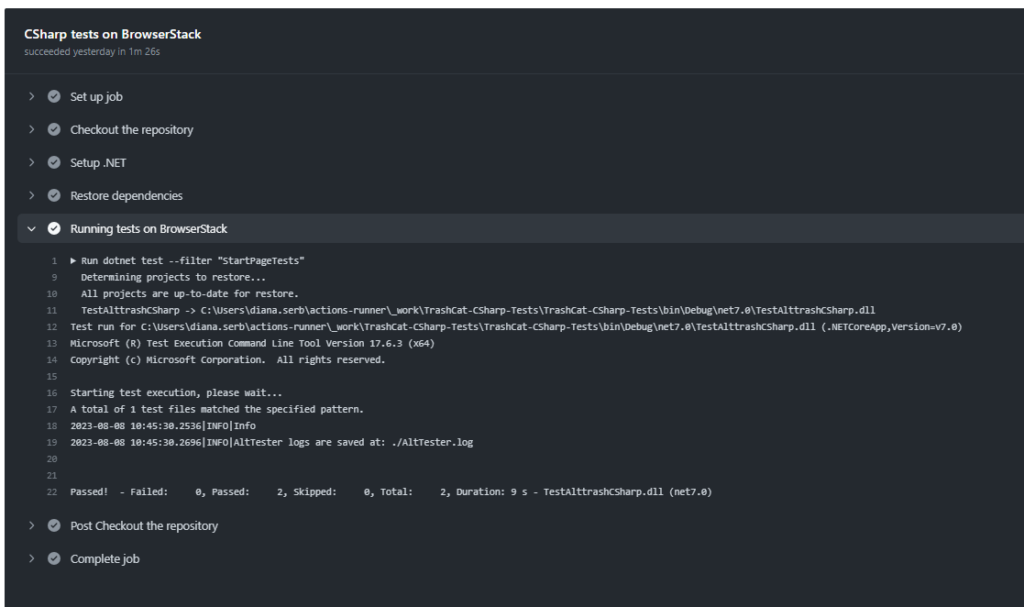
You’ll see four steps defined for this job in the example repository:
- Checkout the repository, so that the workflow can access it
- Setup dotnet, in order to use a specific version of dotnet in the workflow
- Restore dependencies, to ensure that all dependencies required by the project are compatible with each other and there are no conflicts between them
- Run tests
jobs:
  csharp-tests-job:
    name: 'CSharp tests on BrowserStack'
    runs-on: [self-hosted, services]
    steps:
      - name: 'Checkout the repository'
        uses: actions/checkout@v2

      - name: Setup .NET
        uses: actions/setup-dotnet@v1
        with:
          dotnet-version: '7.0'

      - name: Restore dependencies
        run: dotnet restore

      - name: 'Running tests on BrowserStack'
        run:
          dotnet test
To run the workflow, set when you’d like it to be triggered at the beginning of the file. In this example the workflow is set to run on every push on the browserstack-example branch.
name: BrowserStack TrashCat
on:
  push:
    branches:
      - browserstack-example
After the job is picked up by the runner (depending on its availability), and the flow reaches the step “Running tests on BrowserStack”, you’ll see in your BrowserStack Dashboard that a new session has started. This is how a successfully running workflow looks like:
GitHub Actions allows you to seamlessly integrate mobile app testing into your continuous integration and continuous deployment (CI/CD) pipeline. By automating the execution of tests using AltTester Unity SDK on BrowserStack devices within GitHub Actions you can ensure that every code change is thoroughly tested on various devices and the application remains stable throughout the development process.
In conclusion, harnessing the power of GitHub Actions in tandem with BrowserStack’s cloud testing capabilities and AltTester Unity SDK can improve your testing process. By leveraging cloud-based testing, you eliminate the need for maintaining an extensive array of physical devices and browsers.
This example is available on GitHub, so if you wish to see the full repository, check out EXAMPLES-CSharp-Cloud-Services-AltTrashCat. We’re also preparing an article about running AltTester-based C# tests on WebGL builds on BrowserStack. If you’re curious about this, stay in the loop!
If you have any questions, you can always reach us on Discord. Don’t forget to check out our documentation for further information.