- What is Sauce Labs?
- What does client side testing mean?
- Context about the tests for this example
- Prerequisites for this example
- Instructions for prerequisites
- Run the tests
UPDATE Dec. 5, 2023. We have updated the tutorial with all the steps necessary for running AltTester-based tests, with AltTester running on localhost, connected to Sauce Labs devices through a Sauce Connect Proxy tunnel.
UPDATE Oct. 17, 2023. We talked to SauceLabs and confirmed that WebSocket communication is now working for tunnel connections between tests and cloud devices. For this reason, we are now working on running the tests using Sauce Connect Proxy and we will provide setup instructions shortly.
Discover how you can run C# tests, based on the AltTester Unity SDK 2.0.*, on a device in Sauce Labs cloud service. In this article, we will discuss how to configure Appium in tests in order to run them on a device from Sauce Labs. Additionally, we’ll go through all the necessary settings of a virtual machine to which the build will connect.
What is Sauce Labs?
Sauce Labs is a cloud-based platform that provides automated testing solutions for web and mobile applications. It allows developers and testing teams to perform testing across a wide range of browsers, operating systems and devices without the need for setting up and maintaining physical hardware or virtual machines.
This article will provide step-by-step instructions on running AltTester-based C# tests on Sauce Labs for client-side testing and some explanations about the connection between tests (hosted remotely), instrumented application build (launched on a Sauce Labs device) and AltTester Server.
What does client side testing mean?
Client-side testing focuses on examining how an application or website performs for users. When conducting tests on cloud services, it means that you store the test suite on your own computer or a pipeline runner and connect to a device in the cloud as if it was connected to your machine or runner.
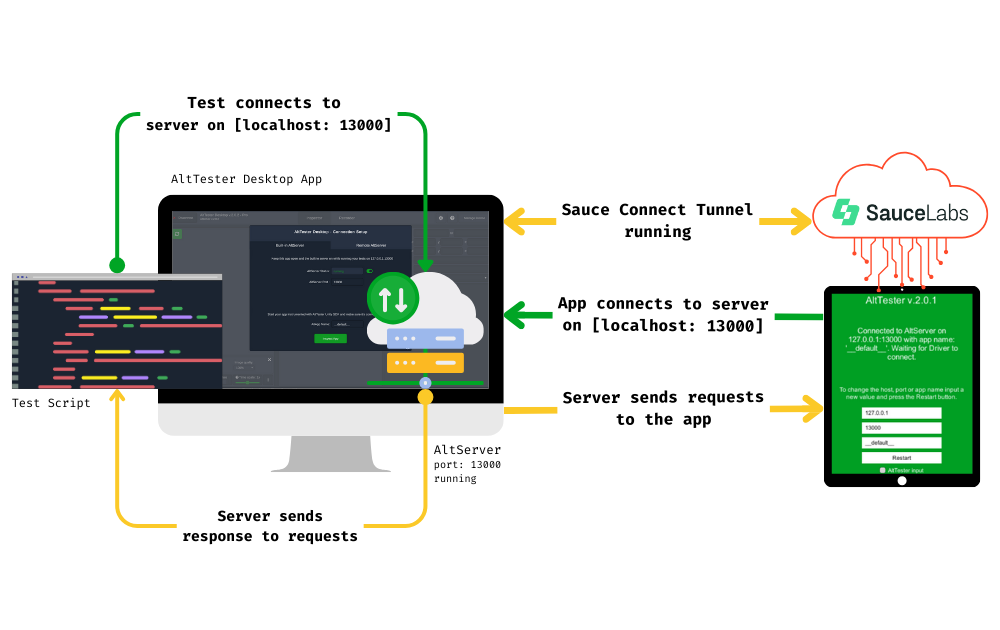
Visual representation of AltTester running on local computer
Visual representation of AltTester running on a Public Virtual Machine
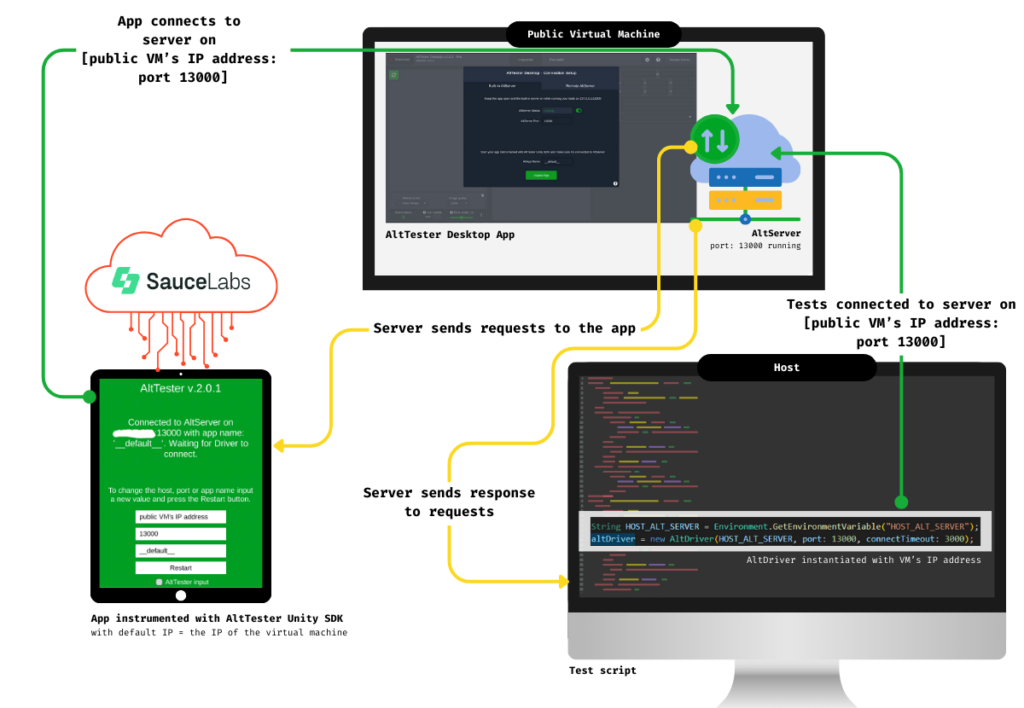
One of the architectural changes from v2.0.0 is that the AltServer module is incorporated in AltTester Desktop. In order to be able to execute tests, we need to have an AltTester Desktop app running and publicly reachable/accessible so that the AltDriver that is instantiated in the tests and the instrumented app can connect to the AltServer.
Context about the tests for this example
The example on which this article is based, shows a series of AltTester-based C# tests, that are running on a Unity sample game instrumented with AltTester SDK 2.0.1. These tests are configured to run on Sauce Labs cloud service.
Later edit: Sauce Connect Tunnel proxy now supports communication via websockets , and the following steps detail how to run tests directly using the Sauce Connect Tunnel, as well as through the option of a public virtual machine.
In this example, the AltTester Desktop app is running locally (or *on a public virtual machine), which can be accessed by the instrumented game installed on a device in the cloud.
Prerequisites for this example
- Have a Sauce Labs account. With a free trial account, you get 60 manual minutes left (which should be enough to run some test suites multiple times on their free devices and emulators).
- Install Sauce Connect Proxy client from your account’s tunneling page. – only if you are not running on a public virtual machine
- Have a set of C# tests that use AltTester Unity SDK 2.0.*. See our example in the steps detailed below.
- Have a build instrumented with AltTester Unity SDK v2.0.2. * If using a virtual machine for running the tests, the build should be created with the host IP of the VM in which AltDesktop app is running.
- Install AltTester Desktop on your local machine (* or on the virtual machine, which can either be a Windows virtual machine running AltTester Desktop in GUI mode or a Linux machine running in batch mode (note that the batch mode requires an AltTester license).
* = if you want to run the tests on a public virtual machine.
The initial setup to run AltTester-based C# tests on a device in Sauce Labs involved having AltTester Desktop running on a public virtual machine, with tests being executed from local computer. In this scenario, the build couldn’t connect to localhost successfully. Sauce Connect Tunnel proxy didn’t have support for communication via websockets at the initial time of writing this tutorial, but they fixed the issue in the meantime. This update is showcased throughout the article.
Here you can find the entire repository of TrashCat tests given as an example in this article.
Instructions for prerequisites
1. Create a public virtual machine (only if you want to run the tests using VM option)
In order to execute the tests, it is required for AltTester Desktop to be installed and launched on the virtual machine, on the default port (13000). This article focuses on the specific settings which are required in order to have a connection between AltServer running on VM, the game build instrumented running on a mobile device in the cloud and the AltTester Driver instantiated in tests on user’s environment.
For this purpose, an Azure virtual machine was used, configured with specific inbound and outbound rules to facilitate the build’s connection. Please consult documentation for more detailed instructions on how to create Windows VM in Azure portal.
Virtual machine network settings
The virtual machine used for this example is running on Windows Server 2019 Datacenter, x64 architecture, Gen2. It is configured with the following inbound and outbound rules:


Beside the default port rules, in order to make AltServer visible by external devices, it was needed to create:
- Inbound port rule for protocol TCP on port 13000: any source from any destination.
Another setting: turn Microsoft Defender Firewall off on the virtual machine.
Download AltTester Desktop on your virtual machine
You can download it from AltTester’s official site. Once downloaded, launch and leave it open, listening on port 13000.
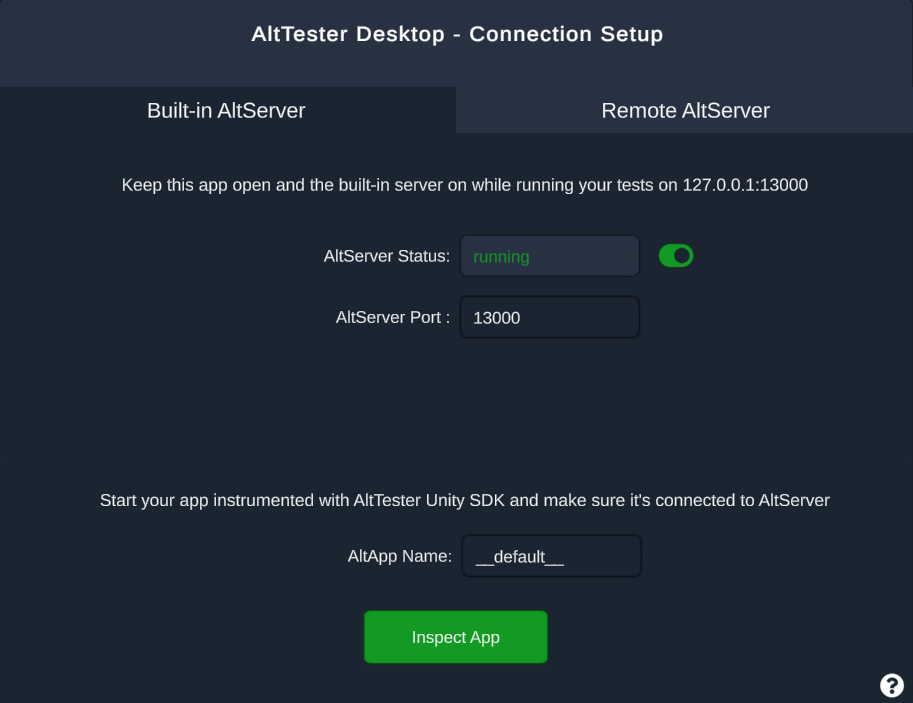
2. Prepare the build
The example on which this article is based is a set of tests for TrashCat endless runner game that we have instrumented in Unity.
A. Using Sauce Connect tunnel proxy
Instrument TrashCat endless runner in Unity
In order for the build to connect to AltServer in the steps provided below, it is necessary to be instrumented with the latest version of AltTester SDK (2.0.2), because of the latest proxy changes that were made for this release. Here is a short guide about how you can instrument your build with AltTester Unity SDK.
If you are not running tests using a public virtual machine, instrument the build with the default IP address.
B. * Running with AltTester Desktop on a virtual machine
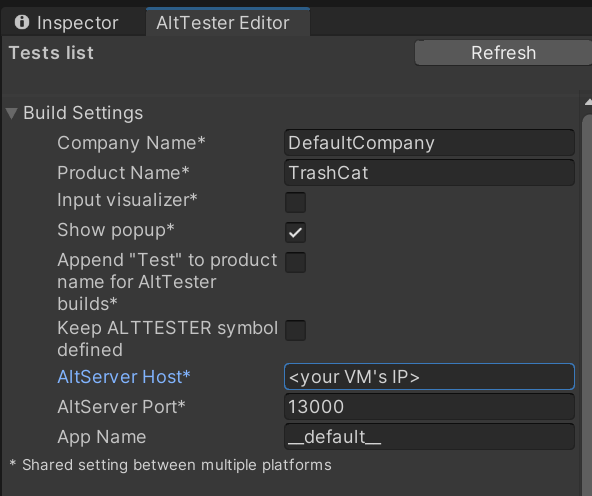
* In order to enable automatic connection between the build and the virtual machine mentioned earlier, it’s essential for the build to have the predefined IP address of the previous virtual machine. This implies that the build will need to be re-instrumented in Unity, with its IP address set to that of the machine. Here is a short guide about how you can instrument your build with AltTester Unity SDK.
How to set a host IP in AltTester Editor window in Unity:
Upload the instrumented build on Sauce Labs
When running tests on a build, you are required to upload the build to the designated page on the Sauce Labs platform (App Management => choose file to upload an app). Once uploaded, Sauce Labs automatically handles the installation and uninstallation of the application, based on the specifications in the code, thereby eliminating the need for manual intervention or writing additional code for installation (only the application name needs to be specified).
3. Code configuration
Install Appium WebDriver
dotnet add package Appium.WebDriver --version 4.4.0Set your Sauce Labs credentials as environment variables
Once you are logged into your Sauce Labs account, you can find the credentials by pressing the key from the main menu:

To set these values as environment variables on Windows you can create a batch file on your local machine and run it every time you load your IDE. This will keep the sensitive information out of the repository. Here is an example:
set SAUCE_USERNAME "yourUsername"
set SAUCE_ACCESS_KEY "yourAccessKey"
* set HOST_ALT_SERVER "your VM's IP"
Create and configure new file
Sauce Labs offers a convenient configuration system that allows capabilities to be written and seamlessly integrated into the code. This can be achieved, for instance, by utilizing a base class (in this case, BaseTest was used ) which all test classes inherit. If you’re interested, you can explore the Platform Configurator feature; here it is a glimpse of how to configure a BaseTest class structure:
a. Access the environment variables set in the previous steps using the GetEnvironmentVariable method like so:
String SAUCE_USERNAME = Environment.GetEnvironmentVariable("SAUCE_USERNAME");
String SAUCE_ACCESS_KEY = Environment.GetEnvironmentVariable("SAUCE_ACCESS_KEY");
b. Configure Appium capabilities and Sauce Labs options
| Android | iOS |
|---|---|
AppiumOptions options = new AppiumOptions(); options.AddAdditionalCapability("platformName", "Android"); options.AddAdditionalCapability("appium:app","storage:filename=<buildName.apk>"); options.AddAdditionalCapability("appium:deviceName", "Samsung Galaxy S10 WQHD GoogleAPI Emulator"); options.AddAdditionalCapability("appium:platformVersion", "11.0"); options.AddAdditionalCapability("appium:deviceOrientation", "portrait"); options.AddAdditionalCapability("appium:automationName", "UiAutomator2"); var sauceOptions = new Dictionary<string, object>(); sauceOptions.Add("appiumVersion", "2.0.0"); sauceOptions.Add("username", SAUCE_USERNAME); sauceOptions.Add("accessKey", SAUCE_ACCESS_KEY); sauceOptions.Add("tunnelName", "alttester"); //only if not running on a virtual machine sauceOptions.Add("build", "<name of the build / any name you want for your test>"); sauceOptions.Add("name", "Test " + DateTime.Now.ToString("dd.MM - HH:mm")); options.AddAdditionalCapability("sauce:options", sauceOptions); | |
c. Start Appium Driver
In order to test remotely on Sauce Labs, it is necessary to employ an instance of the Appium Driver. To do so, use the remote Sauce Labs URL along with your access credentials, which can be found within the AppiumOptions variable named options:
| Android | iOS |
|---|---|
appiumDriver = new AndroidDriver<AndroidElement>(new Uri("https://ondemand.eu-central-1.saucelabs.com:443/wd/hub"), options); | appiumDriver = new IOSDriver<IOSElement>(new Uri("https://ondemand.eu-central-1.saucelabs.com:443/wd/hub"), options); |
d. Initialize AltDriver with custom IP for host parameter (only for running on a public virtual machine)
Since the AltServer is running and listening on the Windows VM previously created, the test classes need to know how to connect to it. In order to enable this connection, the host parameter can be used when AltDriver is instantiated in BaseTest file.
To overcome slow build launches causing test failures due to insufficient waiting, instantiate the altDriver with a connectionTimeout of 3000. This adjustment helps mitigate the issue and ensures that tests are waiting adequately. For further details, you can refer to the AltTester documentation.
String HOST_ALT_SERVER = Environment.GetEnvironmentVariable("HOST_ALT_SERVER");
altDriver = new AltDriver(HOST_ALT_SERVER, connectTimeout: 3000);
e. iOS | Handle permission pop-up
While running your tests on iOS you might get a pop-up that asks for permission to connect to devices on the local network.
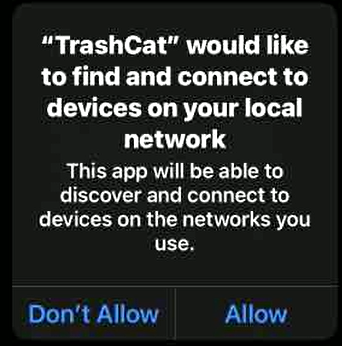
To accept this notification and give permission, use the following lines:
IWebElement ll = appiumDriver.FindElement(OpenQA.Selenium.By.Id("Allow"));
ll.Click();
f. Add method to keep Appium alive
In this context, Appium is only used to install the application and access it on the Sauce Labs test device. After that, AltTester SDK picks up the connection and carries out the tests.
An issue encountered in this example is that Sauce Labs has a default idle timeout for Appium commands of 90 seconds, and in this case, running the tests takes longer than that.

To solve this problem you should add an action that keeps Appium alive in the TearDown method of the framework to ensure that Appium is used after every test. Here is an example:
| Android | iOS |
|---|---|
appiumDriver.GetDisplayDensity(); | appiumDriver.GetClipboardText(); |
Launch Sauce Connect Proxy tunnel – only if you are not using the public virtual machine option
The Tunnel Proxies section from your Sauce Labs account provides guidelines on configuring the tunnel. However, to launch the tunnel, some improvements are needed:
- After downloading Sauce Connect Proxy client (v. 4.9.2), navigate in your terminal to the SC client bin directory (i.e., cd sc-4.9.1-osx/bin);
- Start the tunnel using the following format of code snippet:
sc -u <your-sauce-username> -k <your-sauce-access-key> --region eu-central -B all -i alttester -vThe tunnel is ready once sending the message “you may start your tests” in the terminal.
Run the tests
Before running the tests, make sure that:
- AltTester Desktop is running on the host (your PC or the virtual machine)
- Sauce Labs credentials (and VM’s IP) are set as environment variables
Use the command dotnet test or as you would usually run the tests locally.
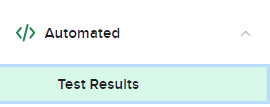
You can find your tests results in the designated section:
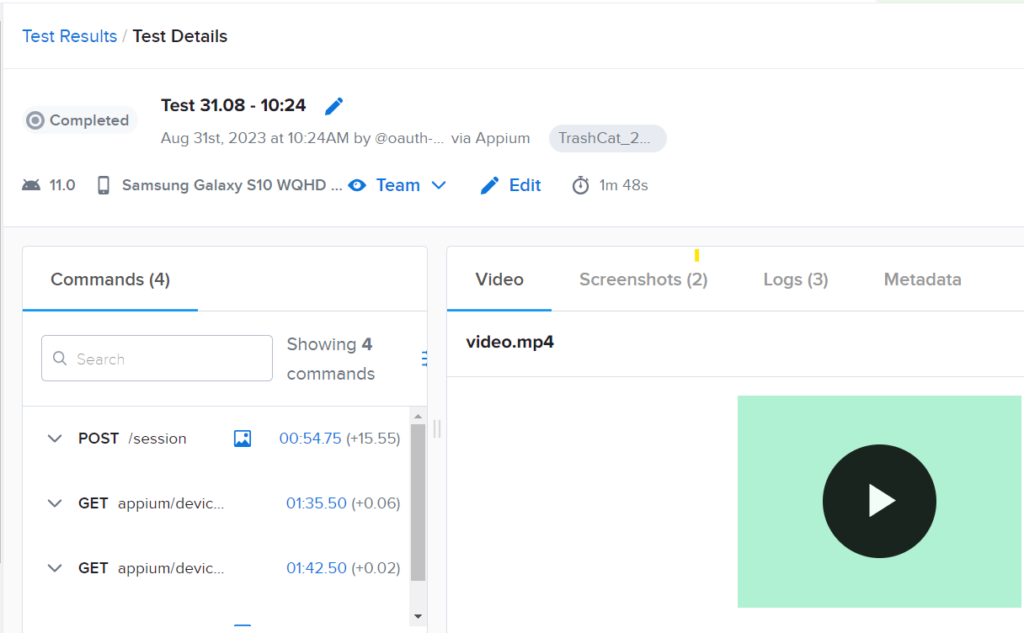
Using a public virtual machine running the AltTester server (listening on port 13000) reduces dependence on Sauce Labs’ infrastructure, particularly the Sauce Connect Tunnel Proxy, which at this point doesn’t support websocket communication. Additionally, automating tests with Sauce Labs devices helps in running tests on a wide range of devices, saves time and resources, provides detailed test reports, and ensures secure test execution.
We hope that this article has assisted you in running AltTester-based tests on Sauce Labs. You can find on our blog a series of articles about running AltTester tests with the help of cloud services (e.g. BrowserStack). If you have any questions, feel free to reach out to us on our Discord channel. Make sure to also explore our documentation for more detailed information.
